Extended Page Table
작성 중… 내용이 너무 방대하다..
Overview
잘 만들어진 최신 해킹툴에서는 사용자에게 보이지 않는 인라인 후킹을 실행합니다.
이를 EPT hooking 또는 Stealth hooking 이라고 합니다. EPT는 Intel CPU에서 제공하는 메모리 가상화 기술(VT-x)에 해당됩니다.
인텔 CPU는 하이퍼바이저에서 GPA(Guest Physical Address)를 HPA(Host Physical Address)로 변환할 때, 이를 하드웨어에서 처리가 가능하도록 기능을 지원합니다.
이때 사용되는 게 EPT(Extended Page Table)입니다.
EPT는 하이퍼바이저를 기반으로 동작하기 때문에 이러한 후킹 기술을 이해하기 위해서는 메모리 가상화를 먼저 이해해야 합니다.
해당 페이지에서는 EPT 후킹과 하이퍼바이저, 메모리 가상화 기술에 대하여 소개합니다.
HyperVisor
하이퍼바이저는 CPU, 메모리, 디스크 등 하드웨어 리소스를 가상화하여 여러 개의 가상 머신을 생성하고 관리하는 소프트웨어를 의미합니다.
동작 방식에 따라 다음과 같은 Bare-Metal 또는 Hosted 타입으로 분류합니다.
Type 1 (Bare-Metal)
Bare-Metal 타입의 하이퍼바이저는 OS를 거치지 않고 하드웨어에서 직접 실행되는 형태를 말합니다. OS로부터 완전히 벗어나기 때문에 성능적인 측면에서 Type2 Hosted와 비교했을 때 매우 빠른 속도를 자랑합니다.
해당 방식을 사용 중인 대표적인 가상 머신으로는 VMware ESXi, Xen, Hyper-V가 존재합니다. 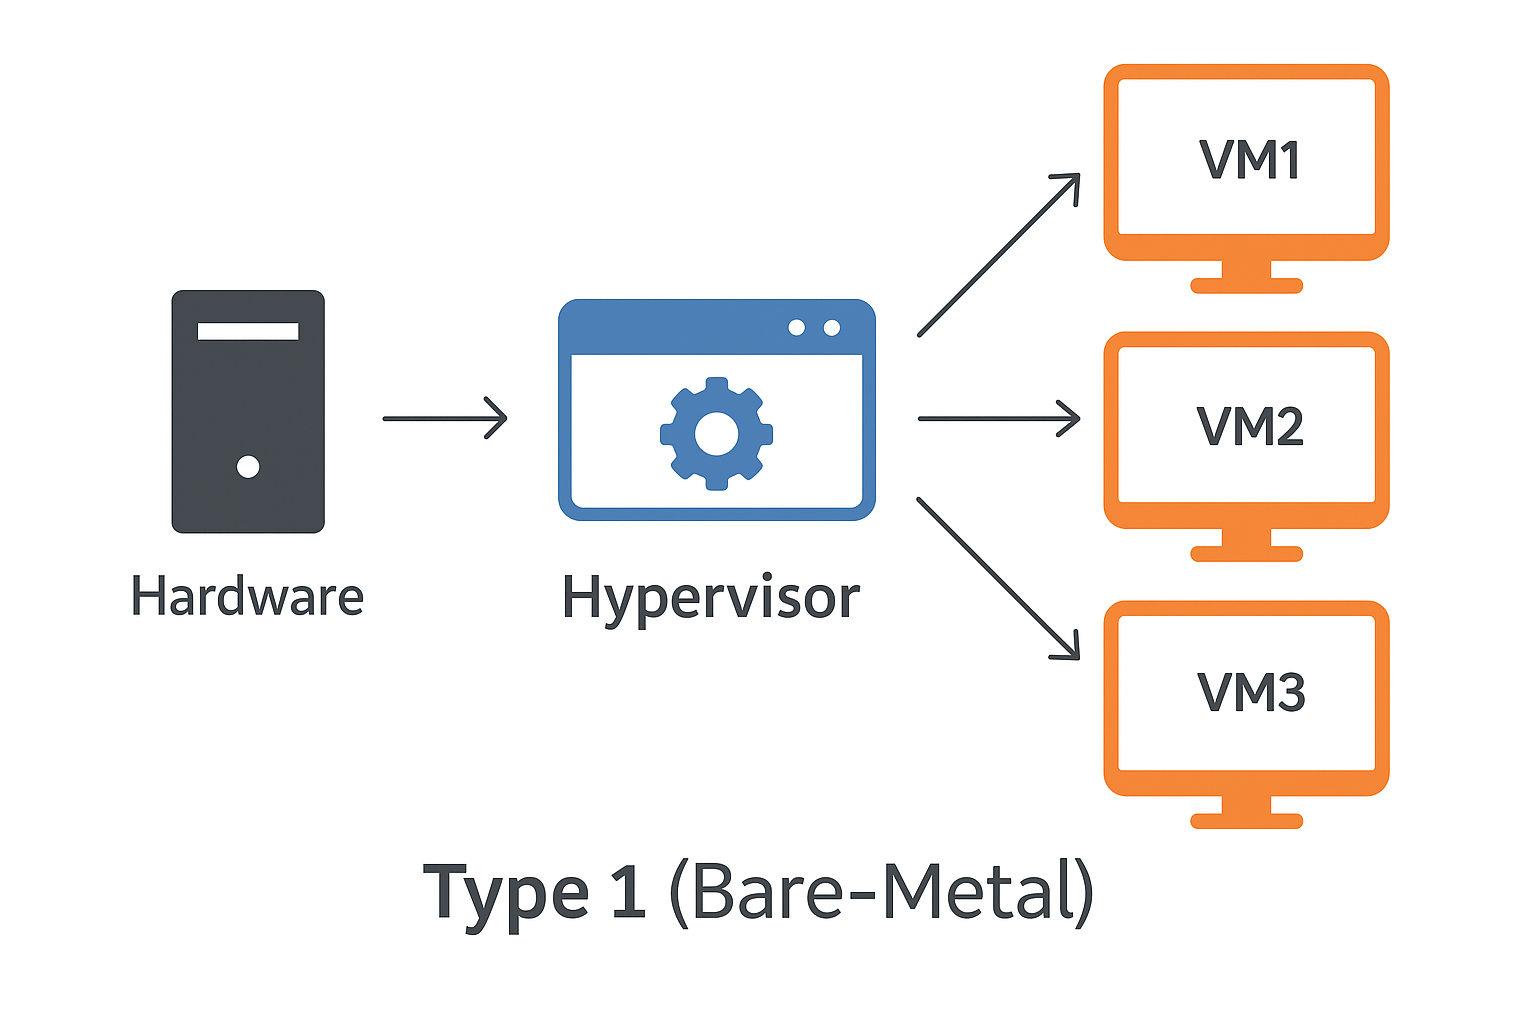
Type 2 (Hosted)
Hosted 타입은 OS를 통해서 실행되는 방식입니다. 모든 행위가 운영체제를 거쳐가기 때문에 Type1 Bare-Metal에 비해 비교적 느린 속도를 가지고 있습니다.
해당 방식을 사용 중인 대표적인 가상 머신으로는 VMware Workstation, VirtualBox, Parallels가 존재합니다. 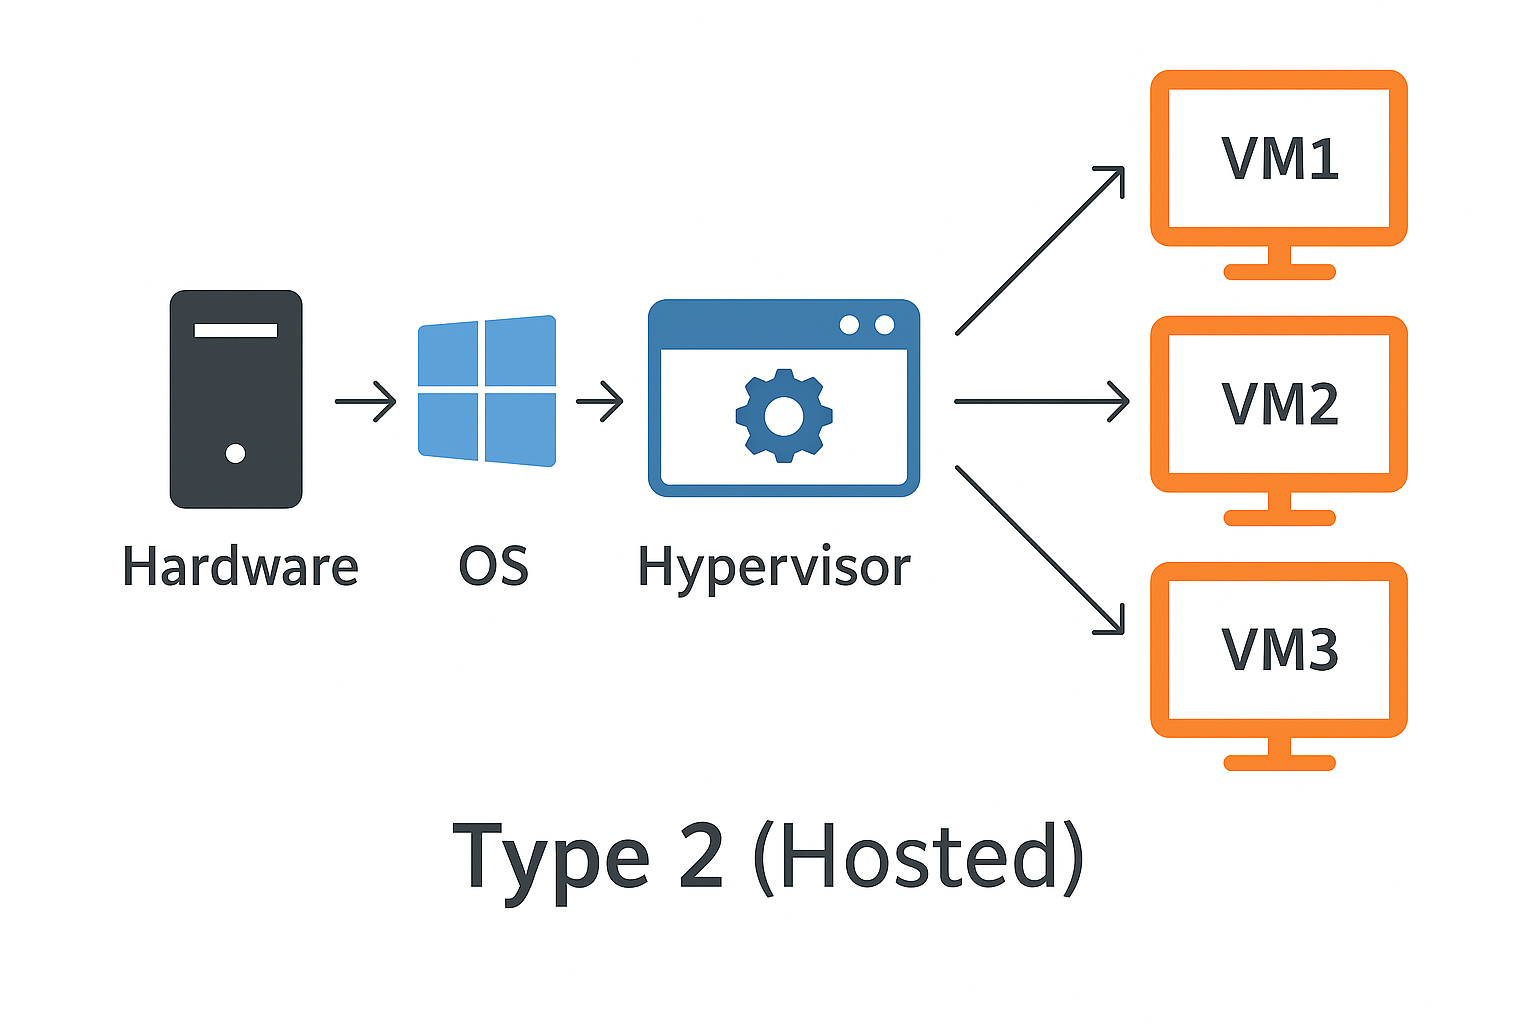
VMM (Virtual Machine Monitors)
VMM은 하이퍼바이저의 핵심 요소이며 VMX을 통해 구현된 소프트웨어를 의미합니다.
아래 사진은 VMM의 실행 구조를 나타냅니다.
CPU가 게스트에 진입하는 경우를 VM-Entry, 게스트에서 호스트로 빠져나오는 경우를 VM-Exit라고 표현합니다. 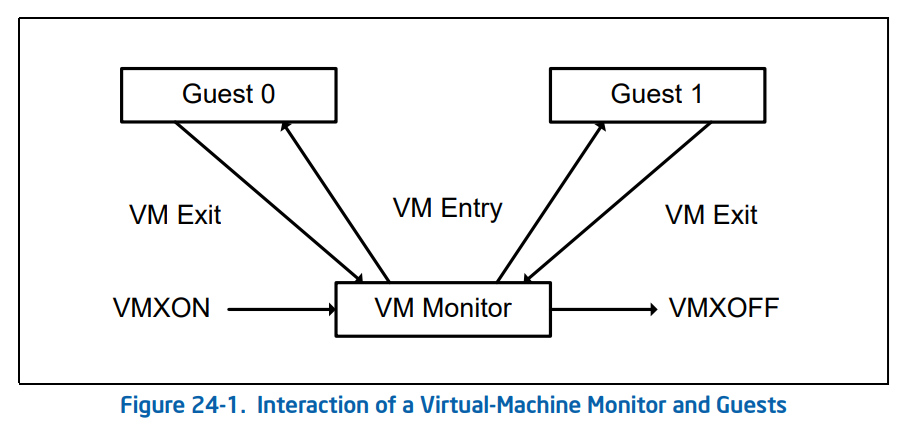
Discovering Support for VMX
VMXON을 실행하기 이전에 CPUID를 통해 VMX 지원 여부를 확인할 수 있습니다.
CPUID에 대한 자세한 내용은 아래에서 서술합니다.
1
2
3
4
5
6
7
8
24.6 DISCOVERING SUPPORT FOR VMX

Before system software enters into VMX operation, it must discover the presence of VMX support in the processor.
System software can determine whether a processor supports VMX operation using CPUID. If
CPUID.1:ECX.VMX[bit 5] = 1, then VMX operation is supported. See Chapter 3, “Instruction Set Reference, A-L” of
Intel® 64 and IA-32 Architectures Software Developer’s Manual, Volume 2A.
The VMX architecture is designed to be extensible so that future processors in VMX operation can support additional features not present in first-generation implementations of the VMX architecture. The availability of extensible VMX features is reported to software using a set of VMX capability MSRs (see Appendix A, “VMX Capability
Reporting Facility”).
Enabling and Entering VMX Operation
VMXON을 실행하기 전에 VMX 기능을 활성화해야 합니다. CR4.VMXE 비트를 1로 변경하는 경우 활성화됩니다.
1
2
3
4
5
6
7
8
9
10
11
12
13
14
15
16
17
18
24.7 ENABLING AND ENTERING VMX OPERATION

Before system software can enter VMX operation, it enables VMX by setting CR4.VMXE[bit 13] = 1. VMX operation
is then entered by executing the VMXON instruction. VMXON causes an invalid-opcode exception (#UD) if executed
with CR4.VMXE = 0. Once in VMX operation, it is not possible to clear CR4.VMXE (see Section 24.8). System software leaves VMX operation by executing the VMXOFF instruction. CR4.VMXE can be cleared outside of VMX operation after executing of VMXOFF.
VMXON is also controlled by the IA32_FEATURE_CONTROL MSR (MSR address 3AH). This MSR is cleared to zero
when a logical processor is reset. The relevant bits of the MSR are:
• Bit 0 is the lock bit. If this bit is clear, VMXON causes a general-protection exception. If the lock bit is set,
WRMSR to this MSR causes a general-protection exception; the MSR cannot be modified until a power-up reset
condition. System BIOS can use this bit to provide a setup option for BIOS to disable support for VMX. To
enable VMX support in a platform, BIOS must set bit 1, bit 2, or both (see below), as well as the lock bit.
• Bit 1 enables VMXON in SMX operation. If this bit is clear, execution of VMXON in SMX operation causes a
general-protection exception. Attempts to set this bit on logical processors that do not support both VMX
operation (see Section 24.6) and SMX operation (see Chapter 7, “Safer Mode Extensions Reference,” in Intel®
64 and IA-32 Architectures Software Developer’s Manual, Volume 2D) cause general-protection exceptions.
• Bit 2 enables VMXON outside SMX operation. If this bit is clear, execution of VMXON outside SMX
operation causes a general-protection exception. Attempts to set this bit on logical processors that do not
support VMX operation (see Section 24.6) cause general-protection exceptions.
Restrictions on VMX Operation
VMXON
4KB 크기의 VMXON Region 메모리를 할당합니다.
할당된 메모리의 첫 4bytes는 VMCS Revision Identifier 값으로 초기화합니다. 해당 값은 MSR (IA32_VMX_BASIC)을 통해 획득할 수 있습니다.
1
2
3
4
5
6
7
8
9
10
11
12
25.11.5 VMXON Region

Before executing VMXON, software allocates a region of memory (called the VMXON region)1 that the logical
processor uses to support VMX operation. The physical address of this region (the VMXON pointer) is provided in an
operand to VMXON. The VMXON pointer is subject to the limitations that apply to VMCS pointers:
• The VMXON pointer must be 4-KByte aligned (bits 11:0 must be zero).
• The VMXON pointer must not set any bits beyond the processor’s physical-address width.2,3
Before executing VMXON, software should write the VMCS revision identifier (see Section 25.2) to the VMXON
region. (Specifically, it should write the 31-bit VMCS revision identifier to bits 30:0 of the first 4 bytes of the VMXON
region; bit 31 should be cleared to 0.) It need not initialize the VMXON region in any other way. Software should
use a separate region for each logical processor and should not access or modify the VMXON region of a logical
processor between execution of VMXON and VMXOFF on that logical processor. Doing otherwise may lead to unpredictable behavior (including behaviors identified in Section 25.11.1).
VMXON 명령의 Opcode는 다음과 같습니다. 호출 시 VMXON Region 메모리의 물리 주소를 전달합니다.

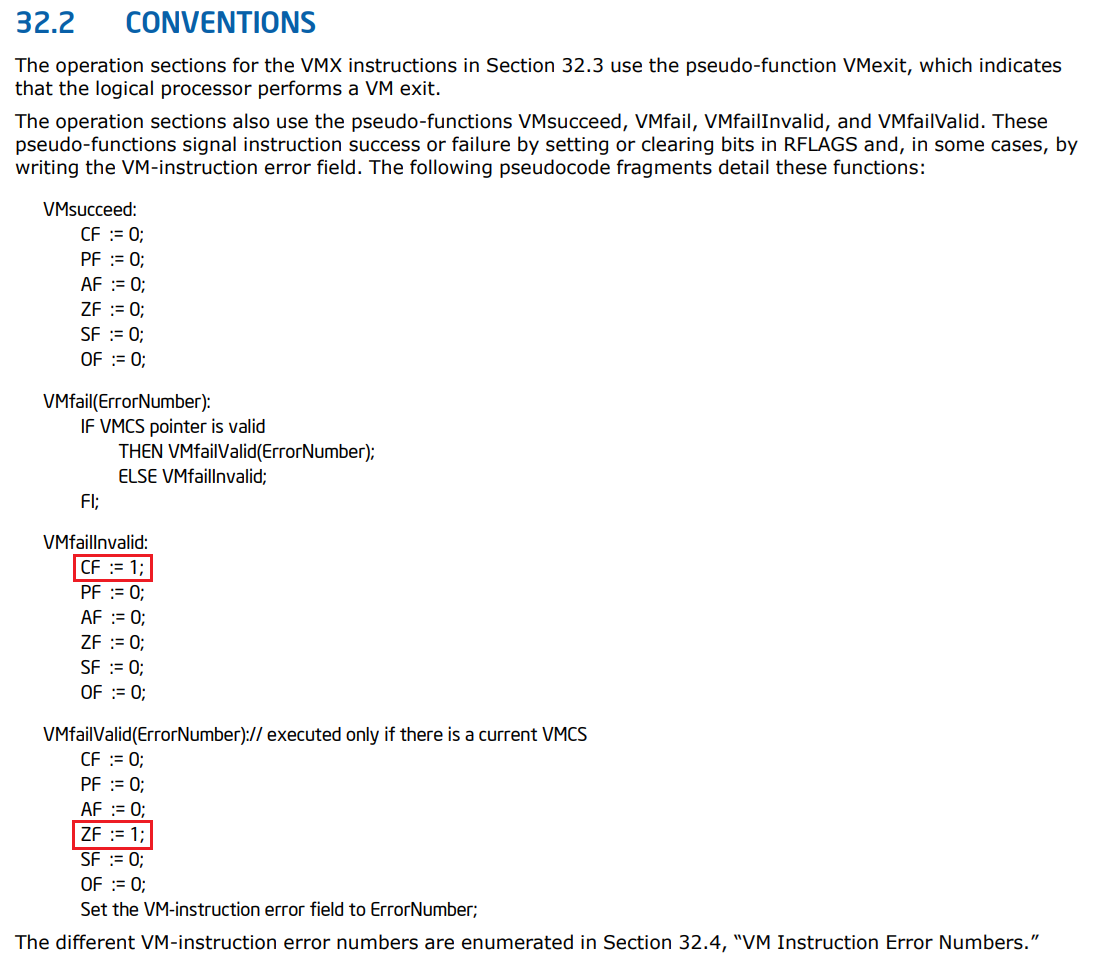
VMXON이 성공하면 VMsucceed를 반환합니다. Flag Register를 통해 확인이 가능하며 CF,ZF가 1인 경우 실패를 의미합니다.
MTRRs (Memory Type Range Registers)
VMCSs (Virtual Machine Control Data Structures)
VCMS는 VMX 구동에 사용되는 데이터 구조체이며 VMCLEAR, VMPTRLD, VMREAD, VMWRITE 명령어를 통해 조작됩니다.
1
2
3
4
5
6
7
CHAPTER 25
VIRTUAL MACHINE CONTROL STRUCTURES

A logical processor uses virtual-machine control data structures (VMCSs) while it is in VMX operation. These
manage transitions into and out of VMX non-root operation (VM entries and VM exits) as well as processor behavior
in VMX non-root operation. This structure is manipulated by the new instructions VMCLEAR, VMPTRLD, VMREAD,
and VMWRITE.
VMCS는 다음과 같이 6개의 데이터 영역으로 구성됩니다. 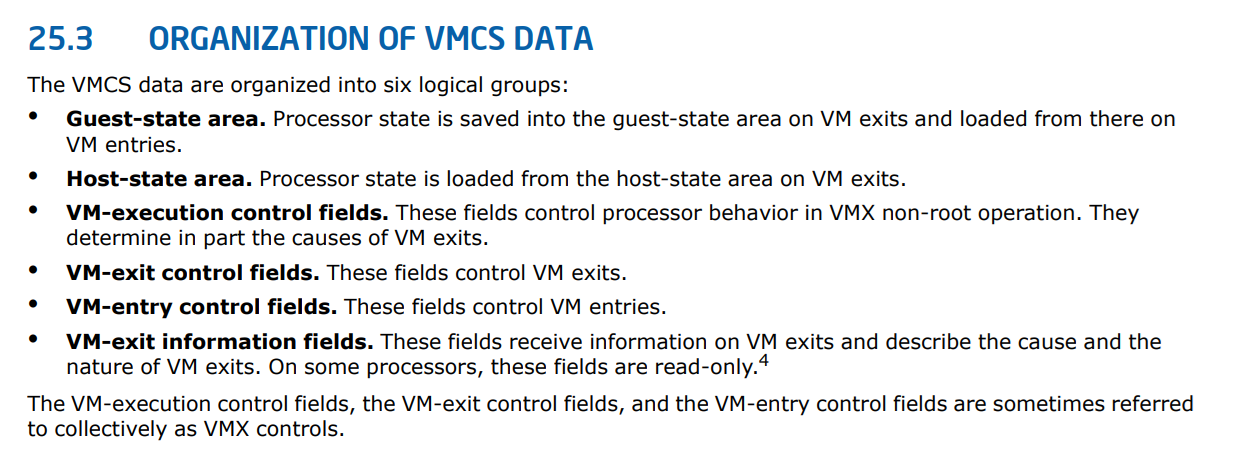
Guest-State Area
Host-State Area
VM-Execution Contorl Fields
VM-Exit Control Fields
VM-Entry Control Fields
VM-Exit Information Fields
EPT (Extended Page Table)
SLAT (Second Level Address Translation)
이전 세대의 VMM에서는 게스트 메모리 주소를 변환할 때 하드웨어가 아닌 하이퍼바이저에서 처리되도록 설계되었습니다.
그렇기 때문에 vm_exit가 빈번하게 발생했고, 그 때마다 항상 하이퍼바이저가 개입되기 때문에 성능이 크게 저하되었습니다.
이러한 문제를 해결하기 위해 SLAT라는 기술이 탄생되었습니다.
하이퍼바이저에서 GPA를 HPA로 변환할 때 CPU(MMU)에서 처리할 수 있도록 제공되는 기능입니다.
SLAT는 이러한 기술들을 일컫는 용어이며 제조사에 따라 명칭에만 차이가 존재합니다.
Intel CPU는 이를 EPT라고 하며, AMD CPU는 NPT(Nested Page Table)라고 표현합니다.
EPTP (Extended Page Table Pointer)
VPID (Virtual Processor Identifier)
Ddimon (HyperPlatform)
앞서 분석한 내용들을 바탕으로 실제 EPT 후킹을 구현한 Ddimon 프로젝트를 살펴보겠습니다.
해당 프로젝트는 HyperPlatform이라고 하는 하이퍼바이저를 기반으로 동작합니다.
DriverEntry를 살펴보면 다음과 같이 VmInitialization라는 함수에서 VMM을 실행합니다.
해당 함수 내부에서는 어떠한 방식으로 가상화가 이루어지는지 하나하나 살펴보겠습니다.
1
2
3
4
5
6
7
8
9
10
11
  // Virtualize all processors
  status = VmInitialization();
  if (!NT_SUCCESS(status)) {
    HotplugCallbackTermination();
    PowerCallbackTermination();
    UtilTermination();
    PerfTermination();
    GlobalObjectTermination();
    LogTermination();
    return status;
  }
VmpIsHyperPlatformInstalled
CPUID 명령을 통해 실행된 환경이 HyperPlatform에 해당되는지 체크합니다.
먼저 다음과 같이 01H를 전달하여 Feature Information 정보를 확인합니다. Intel 공식 문서에서 not_used 필드가 Reserved라고 소개되지만 HyperPlatform에서는 이를 활용하여 실행 유무를 체크하는 것으로 보입니다.
1
2
3
4
5
6
7
8
9
10
11
12
13
14
// Tests if HyperPlatform is already installed
_Use_decl_annotations_ static bool VmpIsHyperPlatformInstalled() {
  PAGED_CODE();

  int cpu_info[4] = {};
  __cpuid(cpu_info, 1);
  const CpuFeaturesEcx cpu_features = {static_cast<ULONG_PTR>(cpu_info[2])};
  if (!cpu_features.fields.not_used) {
    return false;
  }

  __cpuid(cpu_info, kHyperVCpuidInterface);
  return cpu_info[0] == 'PpyH';
}
해당 프로젝트에서 CpuFeaturesEcx 구조체의 주석을 살펴보면 not_used 값이 HypervisorPresent으로 사용되는 것을 확인할 수 있습니다.
1
2
3
4
5
6
7
8
9
10
11
12
13
14
15
16
17
18
19
20
21
22
23
24
25
26
27
28
29
30
31
32
33
34
35
36
37
union CpuFeaturesEcx {
  ULONG32 all;
  struct {
    ULONG32 sse3 : 1;       //!< [0] Streaming SIMD Extensions 3 (SSE3)
    ULONG32 pclmulqdq : 1;  //!< [1] PCLMULQDQ
    ULONG32 dtes64 : 1;     //!< [2] 64-bit DS Area
    ULONG32 monitor : 1;    //!< [3] MONITOR/WAIT
    ULONG32 ds_cpl : 1;     //!< [4] CPL qualified Debug Store
    ULONG32 vmx : 1;        //!< [5] Virtual Machine Technology
    ULONG32 smx : 1;        //!< [6] Safer Mode Extensions
    ULONG32 est : 1;        //!< [7] Enhanced Intel Speedstep Technology
    ULONG32 tm2 : 1;        //!< [8] Thermal monitor 2
    ULONG32 ssse3 : 1;      //!< [9] Supplemental Streaming SIMD Extensions 3
    ULONG32 cid : 1;        //!< [10] L1 context ID
    ULONG32 sdbg : 1;       //!< [11] IA32_DEBUG_INTERFACE MSR
    ULONG32 fma : 1;        //!< [12] FMA extensions using YMM state
    ULONG32 cx16 : 1;       //!< [13] CMPXCHG16B
    ULONG32 xtpr : 1;       //!< [14] xTPR Update Control
    ULONG32 pdcm : 1;       //!< [15] Performance/Debug capability MSR
    ULONG32 reserved : 1;   //!< [16] Reserved
    ULONG32 pcid : 1;       //!< [17] Process-context identifiers
    ULONG32 dca : 1;        //!< [18] prefetch from a memory mapped device
    ULONG32 sse4_1 : 1;     //!< [19] SSE4.1
    ULONG32 sse4_2 : 1;     //!< [20] SSE4.2
    ULONG32 x2_apic : 1;    //!< [21] x2APIC feature
    ULONG32 movbe : 1;      //!< [22] MOVBE instruction
    ULONG32 popcnt : 1;     //!< [23] POPCNT instruction
    ULONG32 reserved3 : 1;  //!< [24] one-shot operation using a TSC deadline
    ULONG32 aes : 1;        //!< [25] AESNI instruction
    ULONG32 xsave : 1;      //!< [26] XSAVE/XRSTOR feature
    ULONG32 osxsave : 1;    //!< [27] enable XSETBV/XGETBV instructions
    ULONG32 avx : 1;        //!< [28] AVX instruction extensions
    ULONG32 f16c : 1;       //!< [29] 16-bit floating-point conversion
    ULONG32 rdrand : 1;     //!< [30] RDRAND instruction
    ULONG32 not_used : 1;   //!< [31] Always 0 (a.k.a. HypervisorPresent)
  } fields;
};
다음으로는 kHyperVCpuidInterface(H40000001) 값을 통해 HyperPlatform 시그니처를 체크합니다.
1
2
3
  __cpuid(cpu_info, kHyperVCpuidInterface);
  return cpu_info[0] == 'PpyH';
}
해당 값은 Intel 공식 문서에서는 Invalid 값으로 확인됩니다. 하지만 HyperPlatform에서는 이를 활용하여 시그니처 값을 반환하도록 합니다.
1
2
3
4
/// A majority of modern hypervisors expose their signatures through CPUID with
/// this CPUID function code to indicate their existence. HyperPlatform follows
/// this convention.
static const ULONG32 kHyperVCpuidInterface = 0x40000001;
1
2
3
4
5
6
7
8
9
10
11
12
13
14
15
16
17
18
19
20
21
22
23
24
25
26
27
// CPUID
_Use_decl_annotations_ static void VmmpHandleCpuid(
    GuestContext *guest_context) {
  HYPERPLATFORM_PERFORMANCE_MEASURE_THIS_SCOPE();
  unsigned int cpu_info[4] = {};
  const auto function_id = static_cast<int>(guest_context->gp_regs->ax);
  const auto sub_function_id = static_cast<int>(guest_context->gp_regs->cx);

  __cpuidex(reinterpret_cast<int *>(cpu_info), function_id, sub_function_id);

  if (function_id == 1) {
    // Present existence of a hypervisor using the HypervisorPresent bit
    CpuFeaturesEcx cpu_features = {static_cast<ULONG_PTR>(cpu_info[2])};
    cpu_features.fields.not_used = true;
    cpu_info[2] = static_cast<int>(cpu_features.all);
  } else if (function_id == kHyperVCpuidInterface) {
    // Leave signature of HyperPlatform onto EAX
    cpu_info[0] = 'PpyH';
  }

  guest_context->gp_regs->ax = cpu_info[0];
  guest_context->gp_regs->bx = cpu_info[1];
  guest_context->gp_regs->cx = cpu_info[2];
  guest_context->gp_regs->dx = cpu_info[3];

  VmmpAdjustGuestInstructionPointer(guest_context);
}
HyperPlatform은 VM-Exit 핸들링을 통해 게스트의 CPUID 명령을 가로챕니다.
게스트에서 CPUID(01H)를 호출하게 되면 not_used를 0x01으로 설정하고, EAX에 시그니처 값을 반환합니다.
1
2
3
4
5
6
7
8
9
10
11
12
13
14
15
16
17
18
19
20
21
22
23
24
25
26
27
// CPUID
_Use_decl_annotations_ static void VmmpHandleCpuid(
    GuestContext *guest_context) {
  HYPERPLATFORM_PERFORMANCE_MEASURE_THIS_SCOPE();
  unsigned int cpu_info[4] = {};
  const auto function_id = static_cast<int>(guest_context->gp_regs->ax);
  const auto sub_function_id = static_cast<int>(guest_context->gp_regs->cx);

  __cpuidex(reinterpret_cast<int *>(cpu_info), function_id, sub_function_id);

  if (function_id == 1) {
    // Present existence of a hypervisor using the HypervisorPresent bit
    CpuFeaturesEcx cpu_features = {static_cast<ULONG_PTR>(cpu_info[2])};
    cpu_features.fields.not_used = true;
    cpu_info[2] = static_cast<int>(cpu_features.all);
  } else if (function_id == kHyperVCpuidInterface) {
    // Leave signature of HyperPlatform onto EAX
    cpu_info[0] = 'PpyH';
  }

  guest_context->gp_regs->ax = cpu_info[0];
  guest_context->gp_regs->bx = cpu_info[1];
  guest_context->gp_regs->cx = cpu_info[2];
  guest_context->gp_regs->dx = cpu_info[3];

  VmmpAdjustGuestInstructionPointer(guest_context);
}
Intel 문서에 따르면 CPUID 명령은 VMX non-root operation(VM Guest)에서 VM-Exit가 발생한다고 합니다.
1
2
3
4
5
26.1.2 Instructions That Cause VM Exits Unconditionally

The following instructions cause VM exits when they are executed in VMX non-root operation: CPUID, GETSEC,1
INVD, and XSETBV. This is also true of instructions introduced with VMX, which include: INVEPT, INVVPID,
VMCALL,2 VMCLEAR, VMLAUNCH, VMPTRLD, VMPTRST, VMRESUME, VMXOFF, and VMXON.
VmpIsVmxAvailable
시스템이 가상화를 지원하는지 체크합니다.
먼저 CPUID를 통해 VMX 필드를 읽습니다. 해당 값이 1이면 프로세서는 VT-x 기능을 지원합니다.
1
2
3
4
5
6
7
8
9
  // See: DISCOVERING SUPPORT FOR VMX
  // If CPUID.1:ECX.VMX[bit 5]=1, then VMX operation is supported.
  int cpu_info[4] = {};
  __cpuid(cpu_info, 1);
  const CpuFeaturesEcx cpu_features = {static_cast<ULONG_PTR>(cpu_info[2])};
  if (!cpu_features.fields.vmx) {
    HYPERPLATFORM_LOG_ERROR("VMX features are not supported.");
    return false;
  }
다음으로 MSR을 통해 VMCS 및 참조되는 구조체에 대한 메모리 타입(Uncacheable, WriteBack)를 읽습니다.
아래 코드에서는 읽어온 메모리 타입이 WriteBack이 아닌 경우 실패를 반환합니다.
1
2
3
4
5
6
7
8
  // See: BASIC VMX INFORMATION
  // The first processors to support VMX operation use the write-back type.
  const Ia32VmxBasicMsr vmx_basic_msr = {UtilReadMsr64(Msr::kIa32VmxBasic)};
  if (static_cast<memory_type>(vmx_basic_msr.fields.memory_type) !=
      memory_type::kWriteBack) {
    HYPERPLATFORM_LOG_ERROR("Write-back cache type is not supported.");
    return false;
  }
다음으로 MSR을 통해 VMX(VMXON) lock bit를 활성화 합니다. 해당 값은 모든 프로세서를 대상으로 적용됩니다.
또한 BIOS 설정에서 VT-x 기능이 활성화 되어있는지 체크합니다.
1
2
3
4
5
6
7
8
9
10
11
12
13
14
  // See: ENABLING AND ENTERING VMX OPERATION
  Ia32FeatureControlMsr vmx_feature_control = {
      UtilReadMsr64(Msr::kIa32FeatureControl)};
  if (!vmx_feature_control.fields.lock) {
    HYPERPLATFORM_LOG_INFO("The lock bit is clear. Attempting to set 1.");
    const auto status = UtilForEachProcessor(VmpSetLockBitCallback, nullptr);
    if (!NT_SUCCESS(status)) {
      return false;
    }
  }
  if (!vmx_feature_control.fields.enable_vmxon) {
    HYPERPLATFORM_LOG_ERROR("VMX features are not enabled.");
    return false;
  }
다음으로 MSR을 통해 EPT 및 VPID에 대한 기능 지원 여부를 체크합니다.
1
2
3
4
  if (!EptIsEptAvailable()) {
    HYPERPLATFORM_LOG_ERROR("EPT features are not fully supported.");
    return false;
  }
1
2
3
4
5
6
7
8
9
10
11
12
13
14
15
16
17
18
19
20
21
22
23
24
// Checks if the system supports EPT technology sufficient enough
_Use_decl_annotations_ bool EptIsEptAvailable() {
  PAGED_CODE();

  // Check the followings:
  // - page walk length is 4 steps
  // - extended page tables can be laid out in write-back memory
  // - INVEPT instruction with all possible types is supported
  // - INVVPID instruction with all possible types is supported
  Ia32VmxEptVpidCapMsr capability = {UtilReadMsr64(Msr::kIa32VmxEptVpidCap)};
  if (!capability.fields.support_page_walk_length4 ||
      !capability.fields.support_write_back_memory_type ||
      !capability.fields.support_invept ||
      !capability.fields.support_single_context_invept ||
      !capability.fields.support_all_context_invept ||
      !capability.fields.support_invvpid ||
      !capability.fields.support_individual_address_invvpid ||
      !capability.fields.support_single_context_invvpid ||
      !capability.fields.support_all_context_invvpid ||
      !capability.fields.support_single_context_retaining_globals_invvpid) {
    return false;
  }
  return true;
}
VmpInitializeVm
모든 프로세서를 대상으로 가상화를 적용합니다.
1
2
3
4
5
6
  // Virtualize all processors
  auto status = UtilForEachProcessor(VmpStartVm, shared_data);
  if (!NT_SUCCESS(status)) {
    UtilForEachProcessor(VmpStopVm, nullptr);
    return status;
  }